
| 일 | 월 | 화 | 수 | 목 | 금 | 토 |
|---|---|---|---|---|---|---|
| 1 | 2 | 3 | ||||
| 4 | 5 | 6 | 7 | 8 | 9 | 10 |
| 11 | 12 | 13 | 14 | 15 | 16 | 17 |
| 18 | 19 | 20 | 21 | 22 | 23 | 24 |
| 25 | 26 | 27 | 28 | 29 | 30 | 31 |
- 전기차충전기
- 완속충전기
- OCPP
- IOT Core
- 서버리스
- 안드로이드
- 충전기
- lambda
- flask
- 디자인패턴
- YMODEM
- everon
- 플라스크
- STM32
- homeassistant
- 라즈베리파이
- Android
- 파이썬
- esp8266
- AWS
- 보안
- 급속충전기
- 전기차충전
- raspberry
- 전기차
- 홈어시스턴트
- 에버온
- 펌웨어
- thread
- dynamodb
- Today
- Total
목록ESPHome (3)
Louie NRT Story
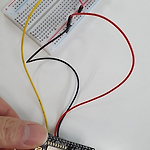
 [HomeAssistant] ESP8266 CT Sensor
Writed: 12 Mar 2020 Index 1. Component 2. DiagramCircuit diagram 3. Make Device 4. Add configuration 5. Upload 6. Check Device's IP 7. Device IngeSetup Integrations and UI card 8. Filter 9. Picture 1. Component - RaspberryPi 3B+ is already installed Hass.io - CT Sensor YHD SCT-013-000 - Resistor 18 Ohms if supply voltage is 3.3v or 33 Ohms if supply voltage is 5v - 10k Ohm resistors 2ea - 10uF C..
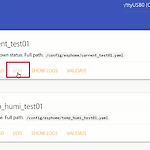
 [HomeAssistant] ESP8266 Temperature&Humidity Sensor
Writed: 12 Mar 2020 Index 1. Component 2. Make Temp&Humi Sensor Device 3. Check ESP8266's IP 4. Setup Integrations and UI card 5. Picture 1. Component 1) Raspberry Pi 3B+ is already installed Hass.io 2) ESP8266 board 3) DHT11 sensor 2. Make Temp&Humi Sensor Device 1) Input device and Wifi information 2) Edit yaml file - If ESPHome Web show "404: Not found" error and can not read ".yaml" file, yo..
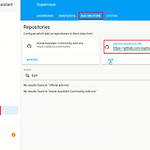 [HomeAssistant] Install ESPHome
Writed: 03 Mar 2020 Index 1. HomeHardware(ESP8266) 2. Install ESPHome 3. Set up Node 4. Compile and Upload 5. Control LED using Slide button 6. Control ESP8266 GPIO D4 LED 1. Hardware(ESP8266) 2. Install ESPHome 1) Input "https://github.com/esphome/hassio" 3. Set up Node 1) Input Name of Node 2) Select Device Type 3) Input Wifi Name and Password 4) Press "SUBMIT" button 5) Check Node of configur..