
| 일 | 월 | 화 | 수 | 목 | 금 | 토 |
|---|---|---|---|---|---|---|
| 1 | 2 | 3 | 4 | 5 | ||
| 6 | 7 | 8 | 9 | 10 | 11 | 12 |
| 13 | 14 | 15 | 16 | 17 | 18 | 19 |
| 20 | 21 | 22 | 23 | 24 | 25 | 26 |
| 27 | 28 | 29 | 30 |
- raspberry
- thread
- 서버리스
- 급속충전기
- 전기차
- 홈어시스턴트
- 보안
- 펌웨어
- flask
- 플라스크
- 라즈베리파이
- IOT Core
- 에버온
- OCPP
- everon
- STM32
- homeassistant
- 디자인패턴
- YMODEM
- 완속충전기
- esp8266
- 충전기
- 전기차충전기
- 전기차충전
- 파이썬
- lambda
- 안드로이드
- Android
- AWS
- dynamodb
- Today
- Total
Louie NRT Story
[HomeAssistant] ESP8266 Temperature&Humidity Sensor 본문
Writed: 12 Mar 2020
Index
1. Component
2. Make Temp&Humi Sensor Device
3. Check ESP8266's IP
4. Setup Integrations and UI card
5. Picture
1. Component
1) Raspberry Pi 3B+ is already installed Hass.io
2) ESP8266 board
3) DHT11 sensor
2. Make Temp&Humi Sensor Device
1) Input device and Wifi information


2) Edit yaml file

- If ESPHome Web show "404: Not found" error and can not read ".yaml" file, you clieck ESPHome button on navigation left side. Reload ESPHome Web.


- Add this configuration
# Example configuration entry
sensor:
  - platform: dht
    pin: D2
    temperature:
      name: "Living Room Temperature"
    humidity:
      name: "Living Room Humidity"
    model: DHT11
    update_interval: 60s
- You can find exmaple on ESPHome Document below picture. They said that the default model is AUTO_DETECT. But AUTO_DETECT model choose DHT22 despite I use DHT11. So Manually specify the DHT model, DHT11.


3. Check ESP8266's IP

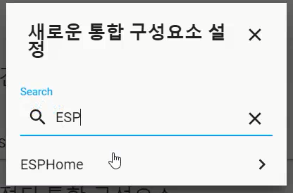
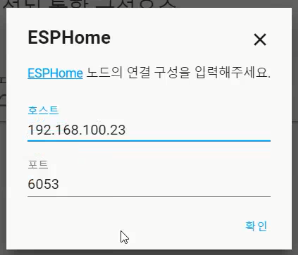
4. Setup Integrations and UI card


5. Picture

Reference:
- https://www.home-assistant.io/
Home Assistant
Open source home automation that puts local control and privacy first.
www.home-assistant.io
PlatformIO is a new generation ecosystem for embedded development
Open source, cross-platform IDE and Unified Debugger. Static Code Analyzer and Remote Unit Testing. Multi-platform and Multi-architecture Build System. Firmware File Explorer and Memory Inspection.
platformio.org
ESPHome
ESPHome Homepage - Reimagining DIY Home Automation. ESPHome is a framework that tries to provide the best possible use experience for using ESP8266 and ESP32 microcontrollers for Home Automation. Just write a simple YAML configuration file and get your own
esphome.io
'스마트홈' 카테고리의 다른 글
| [HomeAssistant] Automation, Scene, Script 구축 (0) | 2020.03.24 |
|---|---|
| [HomeAssistant] ESP8266 CT Sensor (0) | 2020.03.12 |
| [HomeAssistant] Install Hass.io (0) | 2020.03.01 |
| [HomeAssistant] Install ESPHome (0) | 2020.03.01 |
| [HomeAssistant] Introduce (0) | 2020.02.28 |


