
| 일 | 월 | 화 | 수 | 목 | 금 | 토 |
|---|---|---|---|---|---|---|
| 1 | 2 | 3 | 4 | |||
| 5 | 6 | 7 | 8 | 9 | 10 | 11 |
| 12 | 13 | 14 | 15 | 16 | 17 | 18 |
| 19 | 20 | 21 | 22 | 23 | 24 | 25 |
| 26 | 27 | 28 | 29 | 30 | 31 |
Tags
- STM32
- 충전기
- esp8266
- 서버리스
- 플라스크
- 라즈베리파이
- 급속충전기
- lambda
- 디자인패턴
- flask
- IOT Core
- 에버온
- dynamodb
- 홈어시스턴트
- OCPP
- 보안
- 전기차
- homeassistant
- 펌웨어
- 파이썬
- 전기차충전
- thread
- everon
- 안드로이드
- 완속충전기
- Android
- 전기차충전기
- raspberry
- AWS
- YMODEM
Archives
- Today
- Total
목록thinger.io (1)
Louie NRT Story
 [Node MCU ESP8266] LED On/Off via thinger.io
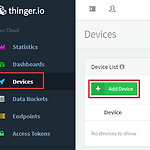
Writed 12 DEC 2019 1. Login and Click Add device https://thinger.io/ 불러오는 중입니다... 2. Make a device and copy Device Credentials 3. Install a library related the Thinger 4. Open the source downloaded 5. Input the Device information 6. Click Dashboard 7. Make a dashboard 8. Add Widget that can control or monitoring the devices 9. Type of Switch because of LED On/Off 10. Select the Device 11. Demo
에너지
2019. 12. 20. 12:05